

dominic_a
-
Posts
11 -
Joined
-
Last visited
Content Type
Profiles
News
Forums
Blogs
Gallery
Events
Everything posted by dominic_a
-
 These are supposed to be in my Mistborn costume gallery, but I accidentally uploaded them to the main gallery and couldn't figure out how to move them. If there's a way to move them, I'd like to know!
 -
Hehe... sewing. I found a premade cloak from a costume store, then bought some darker gray fabric (cotton I think) from a fabric store and used Stitch Witchery (iron-on fake sewing) to attach it all. Then, just had to cut it up! The premade cloak fabric is incredibly cheap and started fraying nearly immediately, so it's developing a worn look rather quickly. The cloak worked well enough for a 5k run, but was entirely impractical for ultimate frisbee. It's too long and I kept tripping over it. Check the cosplay gallery, I just upload an album there.
-
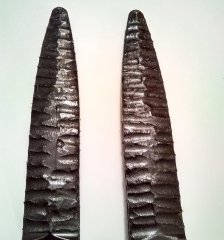
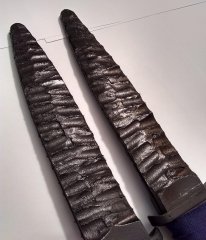
 Primarily included to show how important cleaning up the blade is. By the end, I got lazy and the result shows under a close examination.
 -
-
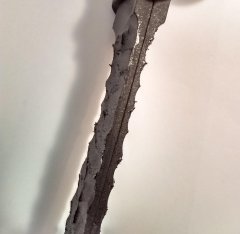
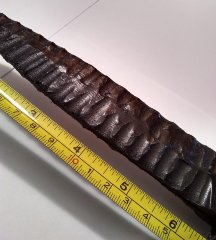 Helps get a feel for how far the ridges are from each other
 -
-
-

From the album: Mistborn Cosplay
Mistcloak, knives, money bag and vial -
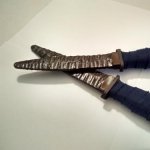
Generic mistborn costume I put together for Halloween 2018. Also including some close-ups of the knives because I couldn't find good examples anywhere else.
-
-
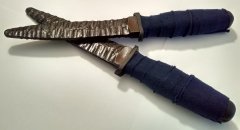
From the album: Mistborn Cosplay
Finished Mistborn cosplay knives. -
Just joining the community. I've been reading Sanderson for a little over a year now and through most of the main series. For Halloween this year, I made a Mistborn costume which turned out well and three people even recognized me! I hope to share some of creating it so it's easier for others.
-
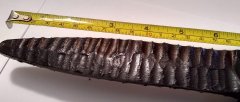
Here’s a write-up for how to make safe, convention acceptable Mistborn knives. These knives are modified rubber training knives spray painted with a glaze to mimic an obsidian knapped knife. They are durable, flexible and safe to play around with! I didn’t take pictures while making them, but I’ve included close ups of the finished product when helpful in the write-up. Difficulty: Easy Time: 2 hours + 24 hours drying time Cost: ~$25 Materials Black rubber training knives. Just search on Amazon and find a shape you like. Clear glaze/gloss spray paint. I found a variety of options at Home Depot but settled on the Rust-Oleum Triple Thick Clear Glaze Cloth to wrap the handles Rotary tool with sanding bit (e.g. a Dremel) Background on Obsidian I researched working and shaping obsidian glass to mimic it in rubber. Blades are created by knapping the material to break off bits to form the blade. The glass is hit near the blade edge creating the sharp edge and the characteristic ridges in an obsidian blade. The ridges will always start at the edge of the blade and work inwards. I recommend searching for pictures of finished obsidian knives and watching a couple videos about knapping obsidian. Steps Use the rotary tool and sanding bit to sand out any lettering on the knives to create a clean base to work with. I found 10k-15k rpm to be a good speed to quickly remove material from the rubber knives. Do this (and all rotary tool work) in an area that's easy to clean up. Sanding the rubber will create a bunch of small rubber pieces/particles that will spread around. Use the rotary tool and sanding bit to create ridges in the material. Again, 10k-15k rpm seemed to be a good speed. I started on one end of the blade and made a valley to the middle of the blade by lightly pressing down with the rotary tool. Repeat that between 1/4” to 3/8” down the blade to create a little ridge between the two valleys (see the pictures). Do this down the length of the blade. Repeat this for the other half of this side. I tried to offset the ridges between the halves to give a more natural look. Then, repeat for the other side of the blade and possibly the other knife as well. The knives will be a matte black at this point, unlike the pictures. The shine only comes from the spray paint glaze. It is easy to hide and mask mistakes in this step; if you don’t like the ridges, go back and make the valleys deeper. Try to deepen the original valleys rather than create new ones. Creating new ones will mean you lose a lot of the rubber and thin the blade. I went back and touched these up multiple times as my technique improved. The spray paint glaze will also help to bring out the underlying texture. Remove any loose/hanging pieces of rubber from the knives. The spray paint glaze will bring out all these imperfections, so it’s best to remove them now. I switched between the rotary tool at low speeds (5k-10k), a file and my fingernails to remove bits of rubber. Some loose rubber still remained on the final product, which can be seen in a close up. You may also try a higher grit (finer) sandpaper bit for the rotary tool at this stage to smooth the rubber even more. I didn’t and the roughness of the rubber is visible in close up shots. Clean the rubber to prepare for spray painting. I washed the knives in water and let them dry, then used packaging tape to dab the blade and get all the finer dust still left on them. You can also mask the handle by wrapping it in an easy-to-remove tape (painters or packaging tape). This will keep spray paint off the handle. Spray paint the blades with the clear glaze/gloss. Follow the instructions for your specific spray paint. I did 2 coats with the triple thick glaze from Home Depot. Let the spray paint fully dry according to the instructions. Add decorations to the handle. the handle is one of the most visible parts of the blade, so this is a main place to make it pop. I was rushed on time and materials so I just cut a couple of 2" strips of cloth, wrapped the handles at an angle and glued it in place. A leather wrapping would look fantastic. Bonus points for a custom handle. Best of luck trying them out. They were a lot of fun to make for my Mistborn costume!